Python의 브라우저 자동화 라이브러리인 Selenium으로 네이버 로그인과
Html 문서 파싱에 쓰이는 Beautifulsoup를 사용한 메일리스트를 가져오는 작업을 해보겠습니다.
테스트 환경은 python 3.7.2입니다.
01. 관련 패키지 설치
|
1
2
3
4
5
6
7
|
$$ pip install selenium
$$ pip install beautifulsoup4
$$ pip freeze
beautifulsoup4==4.8.0
selenium==3.141.0
soupsieve==1.9.2
urllib3==1.25.3
|
cs |
02. 로그인 창 띄우기
네이버(https://naver.com)에서 메일을 클릭해봅시다.
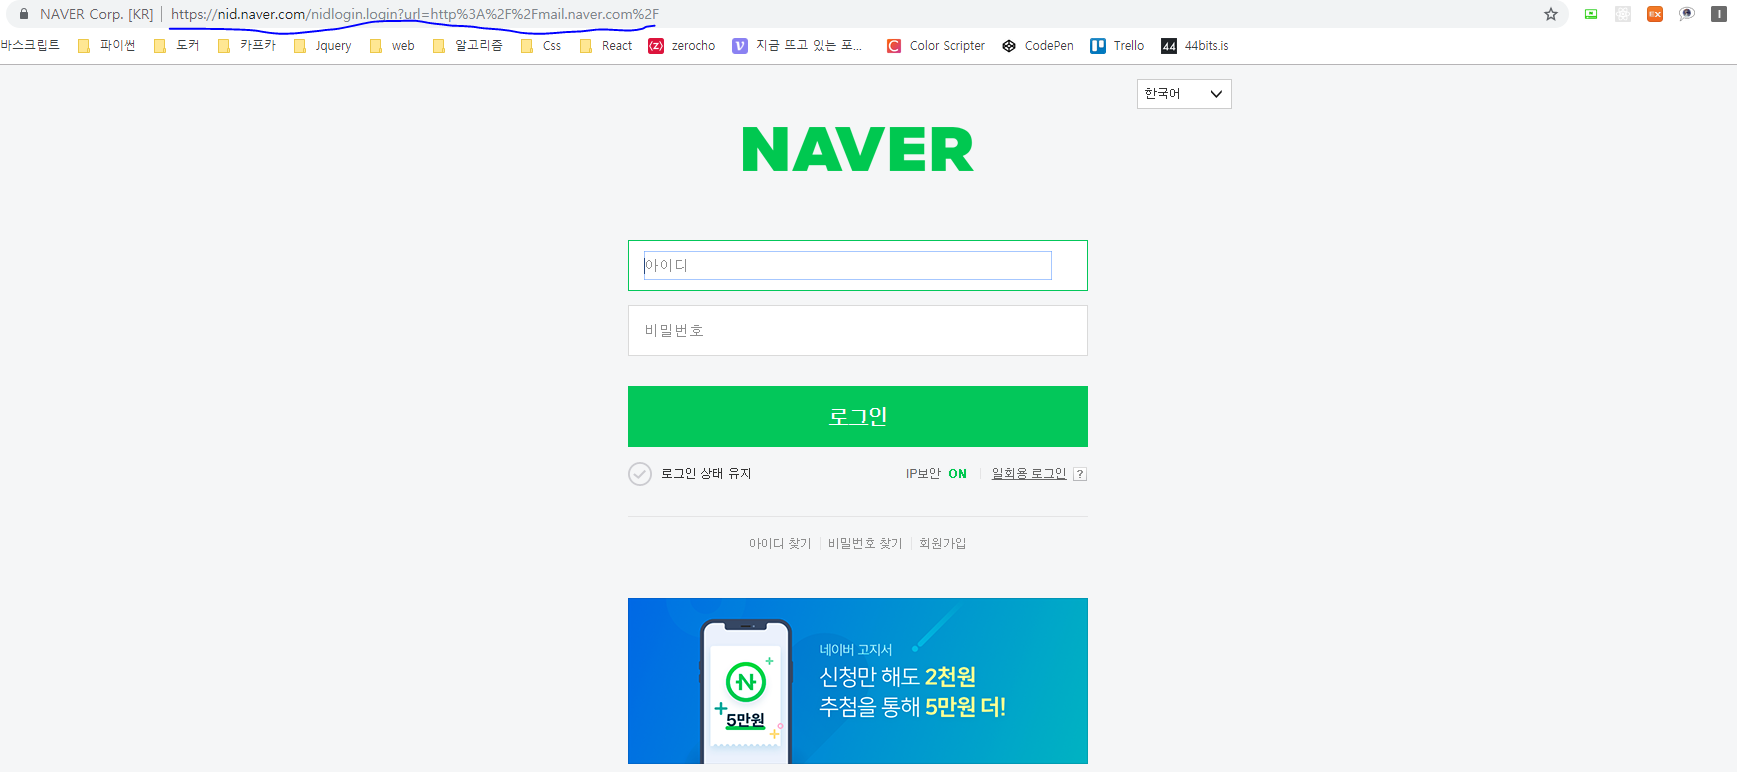
URL을 확인 해보니 아래와 같습니다.
https://nid.naver.com/nidlogin.login?url=http%3A%2F%2Fmail.naver.com%2F
webdriver로 띄워봅시다.
|
1
2
3
4
5
6
7
8
9
10
11
12
13
14
15
16
17
18
19
20
21
22
23
24
25
26
|
from selenium import webdriver
import os
URL = 'https://nid.naver.com/nidlogin.login?url=http%3A%2F%2Fmail.naver.com%2F'
def main():
try:
driver = get_driver()
driver.get(URL)
except Exception as e:
print(str(e))
else:
print("Main process is done.")
finally:
os.system("Pause")
driver.quit()
def get_driver():
driver = webdriver.Chrome(r'C:\chromedriver.exe')
driver.implicitly_wait(3)
return driver
if __name__ == '__main__':
main()
|
cs |
잘 뜨나요? 그렇다면 이제 로그인을 해봅시다.
03. 로그인을 위한 ID, PASSWORD 파일 생성
로그인을 위한 설정파일을 만들어 봅시다.
./config.json
|
1
2
3
4
|
{
"userId": "username",
"userPw": "*******"
}
|
cs |
이후 해당 파일을 읽어서 configuration을 구성시킬 예정입니다.
04. 개발자 도구(F12)로 네이버 로그인 페이지 element 확인
로그인 페이지에서 F12를 눌러 input box를 찾는 방법을 확인해 봅시다.

id를 입력하는 곳은 input box의 id 속성이 "id"이군요.
마찬가지로 password를 입력하는 곳은 id 속성이 "pw"임을 확인 했습니다.(요건 바뀔수 있습니다... 네이버에서 html 구조를 변경 해버리면 바뀌겠죠?)
05. 로그인 해보기
아래와 같이 코드를 작성했습니다.
./script.py
|
1
2
3
4
5
6
7
8
9
10
11
12
13
14
15
16
17
18
19
20
21
22
23
24
25
26
27
28
29
30
31
32
33
34
35
36
37
38
39
40
41
42
43
44
45
46
47
48
49
50
51
52
53
54
55
56
57
58
59
60
61
62
63
64
65
66
67
68
|
from selenium import webdriver
from selenium.webdriver.common.by import By
from selenium.webdriver.support.ui import WebDriverWait
from selenium.webdriver.support import expected_conditions as EC
import os
import json
URL = 'https://nid.naver.com/nidlogin.login?url=http%3A%2F%2Fmail.naver.com%2F'
def main():
try:
driver = get_driver()
driver.get(URL)
config = get_config()
login_naver(driver, config['userId'], config['userPw'])
except Exception as e:
print(str(e))
else:
print("Main process is done.")
finally:
os.system("Pause")
driver.quit()
def get_config():
try:
with open('config.json') as json_file:
json_data = json.load(json_file)
except Exception as e:
print('Error in reading config file, {}'.format(e))
return None
else:
return json_data
def login_naver(driver, id, pw):
# element = driver.find_element_by_css_selector('#id')
element = WebDriverWait(driver, 10).until(
EC.presence_of_element_located((By.CSS_SELECTOR, "#id"))
)
element.send_keys(id)
element = WebDriverWait(driver, 10).until(
EC.presence_of_element_located((By.CSS_SELECTOR, "#pw"))
)
element.send_keys(pw)
element = WebDriverWait(driver, 10).until(
EC.presence_of_element_located((By.CSS_SELECTOR, "input.btn_global"))
)
element.click()
return False
def get_driver():
driver = webdriver.Chrome(r'C:\chromedriver.exe')
driver.implicitly_wait(3)
return driver
if __name__ == '__main__':
main()
|
cs |
* get_config() : 앞서 만든 json파일을 읽어서 configuration을 구성합니다.(id, password)
* login_name(driver, id, pw) : driver 객체와 로그인할 id, password 문자열을 입력받아서 로그인을 수행합니다.
이때 저 같은 경우 WebDriverWait를 사용했습니다. 41번줄의 driver.find_element_by_css_selector()를 사용해도 무관합니다. 하지만 아주 가끔(특히, 페이지 로딩속도가 느리다면) 페이지 로드가 늦어서 찾고자 하는 요소를 찾을 수 없을 때 WebDriverWait를 이용하면 별 탈없이 원하는 element를 가져올 수 있을 겁니다.
element를 가져오는데 성공하면 send_keys()를 이용해서 키 입력을 수행합니다.
그리곤 button element를 찾아 click()을 수행합니다.
또한 저는 대부분 CSS Selector를 사용해서 element에 접근하는데요. 가장 정확하게 원하는 요소를 찾아 오기 때문입니다. CSS Selector에 대해 모르신다면 코드이해가 조금 어려울 수도 있겠네요. 킁 ㅜ
아래와 같이 해도 무관합니다.
- driver.find_element_by_id() : 아이디로 접근
- driver.find_element_by_class_name() : 클래스명으로 접근
- driver.find_element_by_link_text : 요소의 텍스트값으로 접근
- 등등... 자세한건 공식 문서 확인 --> https://selenium-python.readthedocs.io/api.html
실행 해봅시다.
python script.py 라는 명령어로 실행해보니...

위와 같이 자동입력 방지 화면이 뜨네요...
자동화 스크립트로 로그인 할 수 없네요.
그럼 여기까지...
가 아니라 selenium web driver 객체에는 자바스크립트 코드를 실행하는 함수가 있습니다.(excute_script)
요놈은 이용해보도록 하겠습니다.
06. 로그인 함수 재작성
아래와 같이 함수를 작성했습니다.
|
1
2
3
4
5
6
7
8
9
10
11
12
13
14
|
def login_naver_with_execute_script(driver, id, pw):
script = " \
(function execute(){ \
document.querySelector('#id').value = '" + id + "'; \
document.querySelector('#pw').value = '" + pw + "'; \
})();"
driver.execute_script(script)
element = WebDriverWait(driver, 10).until(
EC.presence_of_element_located((By.CSS_SELECTOR, "input.btn_global"))
)
element.click()
return False
|
cs |
script 변수에 (function(){...})(); 를 통해 자바스크립트를 실행 시키려 합니다.
document.querySelector()를 사용해서 id와 password의 값을 설정합니다.
그리고 클릭!
위의 main() 함수 코드에서 login_naver()를 재작성된 login_naver_with_execute_script()로 변경해봅시다.
그리고 실행해보면 https://mail.naver.com/ 가 잘 뜨는걸 확인 할 수 있습니다.
이제부턴 나의 메일함 페이지의 html 소스를 이용해서 보낸사람, 메일제목을 발라(?)내보도록 하겠습니다.
07. 개발자 도구로 메일 페이지 element 파악
먼저 네이버 메일 메인화면 mail.naver.com의 html구조를 파악해봅시다.
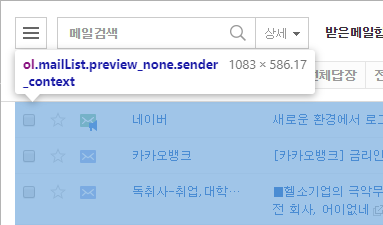
ol 태그에 모든 메일 리스트가 표시 되는 듯하네요.
그리고 name과 subject라는 이름의 div영역에 보낸사람과 메일제목이 표시되는 듯합니다.
08. Beautifulsoup로 값 얻어오기
아래와 같이 html 소스를 파싱해서 보낸이 / 메일제목 을 출력 해 보겠습니다
|
1
2
3
4
5
6
7
8
|
def get_mail_list(page_source):
soup = BeautifulSoup(page_source, "html.parser")
div_list = soup.select("ol.mailList > li > div.mTitle")
for div in div_list:
soup = BeautifulSoup(str(div), "html.parser")
title = soup.select_one("div.name > a").text
subject = soup.select_one("div.subject > a:nth-of-type(1) > span > strong").text
print("{} / {}".format(title, subject))
|
cs |
먼저 ol태그의 div.mTitle element를 리스트 형태로 받아옴니다.
sour.select는 부합하는 element를 리스트 형태로 반환합니다.
그리고 반복문을 통해 div.mTitle을 다시 parse 합니다.
soup.select_one은 최초의 부합하는 element를 반환합니다.
그리고 text 속성은 element로 부터 태그 내의 문자열을 저장하고 있습니다. (6번째줄)
마찬가지로 메일 제목부분도 같은 방법으로 얻어옵니다.
이때 a:nth-of-type(1)은 a태그 중 첫번째 a태그를 얻어오는 것을 의미합니다.
이제 해당 함수를 main()에 추가해서 실행 해봅시다.
아래는 전체 코드입니다.
./script.py
|
1
2
3
4
5
6
7
8
9
10
11
12
13
14
15
16
17
18
19
20
21
22
23
24
25
26
27
28
29
30
31
32
33
34
35
36
37
38
39
40
41
42
43
44
45
46
47
48
49
50
51
52
53
54
55
56
57
58
59
60
61
62
63
64
65
66
67
68
69
70
71
72
73
74
|
from selenium import webdriver
from selenium.webdriver.common.by import By
from selenium.webdriver.support.ui import WebDriverWait
from selenium.webdriver.support import expected_conditions as EC
from bs4 import BeautifulSoup
import os
import json
import time
URL = 'https://nid.naver.com/nidlogin.login?url=http%3A%2F%2Fmail.naver.com%2F'
def main():
try:
driver = get_driver()
driver.get(URL)
config = get_config()
login_naver_with_execute_script(driver, config['userId'], config['userPw'])
time.sleep(5)
get_mail_list(driver.page_source)
except Exception as e:
print(str(e))
else:
print("Main process is done.")
finally:
os.system("Pause")
driver.quit()
def get_config():
try:
with open('config.json') as json_file:
json_data = json.load(json_file)
except Exception as e:
print('Error in reading config file, {}'.format(e))
return None
else:
return json_data
def login_naver_with_execute_script(driver, id, pw):
script = " \
(function execute(){ \
document.querySelector('#id').value = '" + id + "'; \
document.querySelector('#pw').value = '" + pw + "'; \
})();"
driver.execute_script(script)
element = WebDriverWait(driver, 10).until(
EC.presence_of_element_located((By.CSS_SELECTOR, "input.btn_global"))
)
element.click()
return False
def get_mail_list(page_source):
soup = BeautifulSoup(page_source, "html.parser")
div_list = soup.select("ol.mailList > li > div.mTitle")
for div in div_list:
soup = BeautifulSoup(str(div), "html.parser")
title = soup.select_one("div.name > a").text
subject = soup.select_one("div.subject > a:nth-of-type(1) > span > strong").text
print("{} / {}".format(title, subject))
def get_driver():
driver = webdriver.Chrome(r'C:\chromedriver.exe')
driver.implicitly_wait(3)
return driver
if __name__ == '__main__':
main()
|
cs |
./config.json
|
1
2
3
4
5
|
{
"userId" : "아이디",
"userPw" : "*****"
}
|
cs |
python script.py로 실행해보면 잘 출력되는 것을 확인 하실 수 있습니다.
'개발 이야기 > Python' 카테고리의 다른 글
| Docker compose로 Nginx + Flask + uwsgi 배포 (0) | 2019.10.19 |
|---|---|
| Python으로 웹 크롤링(Crawling ) (0) | 2019.07.19 |
| Python Script 작성시 argument 여러개 받기 (0) | 2019.07.16 |
| Selenium으로 웹브라우저 테스트 자동화 (1) | 2019.03.16 |
| Python_bson을 json으로 바꾸는 방법 (0) | 2019.02.14 |


