반응형
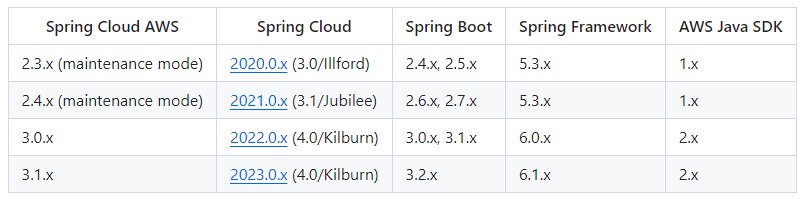
Springboot 버전별로 AWS SDK 버전을 잘 선택해야 합니다.
아래 캡쳐에 따라 그에 맞는 버전을 사용합니다.
- 참고: https://github.com/awspring/spring-cloud-aws
이번 포스팅에서는 AWS의 SQS(Simple Queue Service)를
Springboot에서 사용하는 방법을 기술합니다.
로컬 환경은 아래와 같습니다.
- JDK 17
- Kotlin 1.8.22
- Springboot 3.1.4
- SpringCloudAws 3.0.4
1. 의존성 추가
dependencies {
    implementation("org.springframework.boot:spring-boot-starter-webflux:3.1.4")

    ...(중략)

    implementation(platform("io.awspring.cloud:spring-cloud-aws-dependencies:3.0.4"))
    implementation("io.awspring.cloud:spring-cloud-aws-starter-sqs")

}
위와 같이 버전에 맞는 의존성을 추가해줍니다.
2. application.yml
server:
  port: 8080

spring:
  cloud:
    aws:
      credentials:
        access-key: access_key
        secret-key: secret_key
      region:
        static: us-east-1
AWS 웹 콘솔을 통해 발급받은 Access Key, Secret Key를 기입합니다.
중요한 정보인 만큼 절대 외부 저장소에 올리는 일은 없도록 합시다.

3. Configuration
아래와 같이 설정을 위한 클래스를 만들어 줍니다.
@Configuration
class SqsConfig {

    @Value("\${spring.cloud.aws.credentials.access-key:}")
    val accessKey: String? = null

    @Value("\${spring.cloud.aws.credentials.secret-key}")
    val secretKey: String? = null

    @Value("\${spring.cloud.aws.region.static}")
    val region: String? = null

    private fun credentialProvider(): AwsCredentials {
        return object : AwsCredentials {
            override fun accessKeyId(): String {
                return accessKey ?: ""
            }

            override fun secretAccessKey(): String {
                return secretKey ?: ""
            }
        }
    }

    @Bean
    fun sqsAsyncClient(): SqsAsyncClient {
        return SqsAsyncClient.builder()
                .credentialsProvider(this::credentialProvider)
                .region(Region.of(region))
                .build()
    }

    @Bean
    fun defaultSqsListenerContainerFactory(): SqsMessageListenerContainerFactory<Any> {
        return SqsMessageListenerContainerFactory.builder<Any>()
                .configure { opt ->
                    opt.acknowledgementMode(AcknowledgementMode.MANUAL)
                }
                .sqsAsyncClient(sqsAsyncClient())
                .build()
    }

    @Bean
    fun sqsTemplate(): SqsTemplate {
        return SqsTemplate.newTemplate(sqsAsyncClient())
    }
}- SqsAsyncClient Bean을 만듭니다.
- defaultSqsListenerContainerFactory Bean을 만듭니다.
- Bean Name에 주의하세요. 만약, 다른 이름으로 작성한다면, 이후 @SqsListener에 똑같이 기입해줘야합니다.
- AcknowledgementMode를 수동으로 변경해줍니다.
- 메시지 에러 처리나 Retry 등을 핸들링 할 때 유리 할 수 있습니다.
- sqsTemplate Bean을 만듭니다.
4. 메시지 전송
@Component
class Sender(val sqsTemplate: SqsTemplate) {

    fun send(payload: String): SendResult<String> {
        return sqsTemplate.send { sendOpsTo ->
            sendOpsTo
                    .queue("sqs-test-name.fifo")
                    .payload(payload)
        }
    }
}
위와 같이 메시지 전송을 담당하는 컴포넌트를 만들어 줍시다.
queue name은 SQS Name을 기입해줍니다. SQS URL도 가능합니다.
5. 메시지 구독
@Component
class Receiver {

    @SqsListener(value = ["sqs-test-name.fifo"])
    fun listen(payload: Any, @Headers headers: MessageHeaders, acknowledgement: Acknowledgement) {
        // TODO
        acknowledgement.acknowledge()
    }
}
위와 같이 간단하게 구독 처리하는 컴포넌트를 만들수 있습니다.
참고)
https://github.com/awspring/spring-cloud-aws
https://docs.awspring.io/spring-cloud-aws/docs/3.0.4/reference/html/index.html
반응형
'개발 이야기 > Springboot' 카테고리의 다른 글
| Springboot에서 P6Spy 통해 쿼리 로깅 (0) | 2024.02.03 |
|---|---|
| Springboot에서 ArchUnit 사용해서 아키텍처 테스트 (0) | 2024.01.27 |
| Testcontainers로 테스트 코드 만들기 2(with Kotlin) (0) | 2024.01.18 |
| Testcontainers로 테스트 코드 만들기 (0) | 2024.01.07 |
| Springboot Application 로드 시 외부 파일 읽기 & 환경 설정 (0) | 2024.01.07 |
